Showing posts with label Review. Show all posts

Just Posted: Nikon Coolpix P310 review


Just Posted: our review of the Nikon Coolpix P310 mid-level compact camera. The P310 builds on the groundwork done by its predecessor, the Coolpix P300 - offering the manual control of its more expensive enthusiast peers, such as Canon's S100 but using a smaller sensor to keep the cost down. The P310 features a 24-100mm equivalent, F1.8-4.9 lens in front of a 16MP back-lit CMOS sensor capable of 1080p30 video.

Click here to read our Nikon Coolpix P310 review

Nikon D800 review updated with D800E side-by-side testing


Just Posted: We've just added in-depth analysis of the Nikon D800E to our D800 review. We've spent some time testing the D800E alongside the conventional D800, shooting real-world samples and high-precision studio test shots. We've added four extra pages of content and analysis to the D800/D800E review showing exactly what the differences are between the cameras, both for stills and video work. We've added a 32-image D800E sample gallery and subjected the D800E to our scoring process. We've also used the time with the two cameras to look at the benefits of shooting uncompressed HD video footage.

Just Posted: Canon Rebel T4i / EOS 650D preview with real-world samples


Just Posted: We've been shooting with Canon's latest entry-level DSLR - the Rebel T4i (EOS 650D), and have prepared an hands-on preview. The T4i shares many of the headline specs (18MP CMOS sensor, 9-point AF system, 1.0M dot flip-out LCD) with its predecessor, the EOS 600D / Rebel T3i, but significant changes have been made to every one of those features. The result is the first touch-screen DSLR and the first EOS to offer continuous AF in movie shooting mode. Read our preview to find out more about the 650D's features and what its 'Hybrid AF' really offers. The preview includes real-world samples and low-light studio shots.

Just Posted: Sony DSC-RX100 preview with sample images


We've been using a Sony DSC-RX100 for the last few days and have prepared a hands-on preview of the 20MP, 1" sensor compact. Its 13.2 x 8.8mm sensor is over twice the size of most of its peers and, despite this being the same size as Nikon's 1 system cameras, the RX100 is genuinely pocketable. We've used our time with the camera to prepare a detailed preview, looking at the camera's key features, and have also shot a gallery of real-world samples in a variety of shooting situations.

Just Posted: Canon PowerShot SX260 HS Review


Just Posted: Canon PowerShot SX260 HS review. We've collaborated with Jeff Keller of the Digital Camera Resource Page to bring you an 8-page review of Canon's latest travel zoom. The SX260 HS features a 12MP sensor and a 20x optical zoom spanning an effective range of 25-500mm. It also offers inbuilt GPS and a Smart Auto mode which can select from 58 scene modes automatically depending on the shooting environment. So how does it perform overall? Read our 8-page review to find out.

This review is based on one originally published at the Digital Camera Resource Page, enhanced with a full set of our own product images, our usual studio comparisons and an expanded samples gallery, plus the addition of a standard dpreview score.

Nikon D3200 hands-on preview with test samples


Preview based on a production Nikon D3200

Nikon has updated its entry-level DSLR offering with the addition of a 24MP CMOS sensor. This makes it equal to Sony's A65, A77 and NEX-7 in offering the highest pixel count we've yet seen at the APS-C sensor size, and second only to the full-frame professional-grade D800 in Nikon's entire range. The significant thing, though, is that it does so at a starting price of $699 (the same launch price as the D3100 and Panasonic DMC G3, for comparison). It may not be revolutionary, but it promises a lot of camera for a competitive amount of money.

Pixel-count aside, the changes from the D3100 are subtle but, with 1080p30 video, a 920k dot LCD and the option to add an affordable Wi-Fi transmitter, there are clear benefits over the D3100's pretty capable specification. As usual for Nikons at this level, the D3200 doesn't feature a built-in focus motor, doesn't offer auto exposure bracketing and has simplified Active D-Lighting options but beyond these, there's little missing that you could reasonably expect for this class of camera. It even regains the option to trigger the camera with an infrared remote - with the inclusion of sensors on the front and rear of the camera.

The inexorable rise of the mirrorless camera has undoubtedly put particular pressure on the entry-level end of the large sensor market. The smaller body sizes of mirrorless cameras, combined with their more compact-camera-like operation has helped win-over some people who would otherwise have bought a DSLR, as well as drawing people away from high-end compacts. However, entry-level DSLRs still offer a very attractive and polished photographic tool - and with continuous autofocus behavior that no mirrorless camera has come close to matching (aside from Nikon's own 1 V1 and 1 J1, which feature smaller 'CX' sensors). With this in mind, it's understandable Nikon would wheel-out a camera with a big headline specification to look impressive on the shop shelf.

Although its upgrades aren't necessarily the product of great leaps of ingenuity, the D3200 is a continuation of a carefully evolved - and tailored to suit its market - line of cameras, that offers tremendous capability with well thought-out ease-of-use. If the image quality comes anywhere near that of the 24MP Sonys, the D3200 is going to be a tough camera to compete with.

The only thing that seems odd on the D3200 is the lack of image processing filters at the point of capture. Since Olympus introduced its Art Filters to the E-30 back in 2008, processing filters have become increasingly common on most cameras. And, while they're not an essential feature by any means, they're nice to have, especially in a camera at this level. Given that Nikon's P7100 offers a selection of special processing effects, it's a little odd not to see them here. There's an option to re-process JPEGs, though - with examples in our preview samples gallery.

Nikon D3200 specification highlights

24MP CMOS sensor
ISO 100-6400 (plus ISO 12,800-equivalent Hi1 setting)
Expeed 3 processing
3.0", 920k dot screen
Full HD 1080p30 video (with 25p and 24p options)
Microphone socket
Twin IR remote receivers
4 frame-per-second continuous shooting
Guide mode
Compared to its peers:


Side-by-side against the Panasonic G3, it's immediately apparent the size trade-off you make to retain an optical viewfinder. In this comparison the mirrorless Panasonic has a slightly smaller sensor, but Sony's NEX and Samsung's NX models aren't much larger than the G3 while boasting APS-C sensors.


The D3200 is very similar in size to Canon's Rebel T3/EOS 1100D, with which it nominally competes. The T3, while a very likeable camera, looks very off-the-pace with its 12MP sensor, 720P movies and 230k dot screen.

Wi-Fi option (WU-1a)

Alongside the D3200, Nikon announced an optional Wi-Fi transmitter for the camera. The WU-1a clips into the USB socket of the D3200 and allows you to broadcast its images to smartphones and tablets running a Nikon app. The unit allows the camera's live view output to be streamed to the smart device and allows images to be shot remotely (at a distance of up to 49ft, but with no control over the camera's settings).

Initially an app will be available for Android phones and tablets, with an iOS version expected in fall/autumn 2012. We're told the app will allow either full-size or VGA-resolution images to be transferred from the camera, but we have yet to see how long it would take to grab a 24MP image. We would also like to see how securely the unit attaches to the camera, given that it sticks out of the side, and looks like it might be a little easy to dislodge. It also requires the port cover that reaches all the way up the camera's flank to be left hanging open all of the time that it's in use.


If you're new to digital photography you may wish to read the Digital Photography Glossary before diving into this article (it may help you understand some of the terms used).

Conclusion / Recommendation / Ratings are based on the opinion of the reviewer, you should read the ENTIRE review before coming to your own conclusions.

Images which can be viewed at a larger size have a small magnifying glass icon in the bottom right corner of the image, clicking on the image will display a larger (typically VGA) image in a new window.

To navigate the review simply use the next / previous page buttons, to jump to a particular section either pick the section from the drop down or select it from the navigation bar at the top.

DPReview calibrate their monitors using Color Vision OptiCal at the (fairly well accepted) PC normal gamma 2.2, this means that on our monitors we can make out the difference between all of the (computer generated) grayscale blocks below. We recommend to make the most of this review you should be able to see the difference (at least) between X,Y and Z and ideally A,B and C.


This article is Copyright 2011 and may NOT in part or in whole be reproduced in any electronic or printed medium without prior permission from the author.


Buy the Nikon D3200 from Amazon
Nikon D3200 24.2 MP CMOS Digital SLR
with 18-55mm f/3.5-5.6 AF-S DX VR NIKKOR Zoom Lens (Black)
$699.00
Nikon D3200 24.2 MP CMOS Digital SLR
with 18-55mm f/3.5-5.6 AF-S DX VR NIKKOR Zoom Lens (Red)
$699.00
Nikon D5100 16.2MP CMOS Digital SLR Camera
with 18-55mm f/3.5-5.6 AF-S DX VR Nikkor Zoom Lens
$646.95
Nikon D3100 14.2MP Digital SLR Camera
with 18-55mm f/3.5-5.6 AF-S DX VR Nikkor Zoom Lens
$546.95
Nikon D90 12.3MP DX-Format CMOS Digital SLR Camera
with 3.0-Inch LCD (Body Only)
Too low to display
Click here to view all listings
Get more prices from Amazon

Support this site, buy the Nikon D3200 from affiliate retailers

Abe's of Maine
Nikon D3200 Red Digital SLR Camera
$699.95
Unique Photo
Nikon D3200 Red Digital SLR Camera
$699.00

Abe's of Maine
Nikon D3200 Black SLR Digital Camera Kit
w/ 18-55 mm Lens
$699.95

Samy's Camera Inc
Nikon D3200 Black SLR Digital Camera Kit
w/ 18-55 mm Lens
$699.95

BestPricePhoto.com
Nikon D3200 Black SLR Digital Camera Kit
w/ 18-55 mm Lens
$799.00
Unique Photo
Nikon D3200 Black SLR Digital Camera Kit
w/ 18-55 mm Lens
$699.00

In-depth Review of the Panasonic Lumix DMC-ZS20/TZ30


Just published: Jeff Keller's in-depth review of the Panasonic Lumix DMC-ZS20 (TZ30 outside the US). The ZS20 is the slimmest 20x zoom camera on the market, with a lens covering a 24-480mm equivalent range and featuring the company's latest Power O.I.S stabilization. The 14MP high-speed MOS sensor allows the ZS20 to autofocus in as little as 0.1 seconds, and shoot at up to 10 frames per second (5fps with AF-tracking). It also has GPS and an updated mapping function to show photos on a map with greater detail. The ZS20 can capture 1080p60 movies in AVCHD or, in an interesting step for one of the creators of AVCHD, it can shoot 1080p30 in MP4 format.


This review is based on one originally published at The Digital Camera Resource Page, enhanced with a full set of our own product images, our usual studio comparisons and an expanded samples gallery, plus the addition of a standard dpreview score. We've been fans of Jeff's work at dcresource for years and we'll be working with him to bring some of his top-quality reviews to dpreview.com in the coming months. We want to give you as much high-quality content as we can, in as timely a fashion as possible and we believe this is a great way of diversifying our reviews. Let us know what you think.

Click here to read Jeff Keller's in-depth review of the Panasonic Lumix DMC-ZS20 (TZ30)


Panasonic Lumix DMC-ZS20 (Lumix DMC-TZ30)
Add to: Login to add this item to your gear lists.
Buy the Panasonic Lumix DMC-ZS20 (Lumix DMC-TZ30) from Amazon
Panasonic Lumix ZS20 14.1 MP High Sensitivity MOS Digital Camera
with 20x Optical Zoom (Black)
$290.50
Panasonic Lumix ZS20 14.1 MP High Sensitivity MOS Digital Camera
with 20x Optical Zoom (Silver)
$295.95
Panasonic Lumix ZS20 14.1 High Sensitivity MOS Digtial Camera
with 20x Optical Zoom, Red (DMC-ZS20R)
$299.00
Panasonic Lumix DMC-ZS10 14.1 MP Digital Camera
with 16x Wide Angle Optical Image Stabilized Zoom and Built-In GPS Function (Blue)
$184.99
Panasonic Lumix DMC-ZS8 14.1 MP Digital Camera
with 16x Wide Angle Optical Image Stabilized Zoom and 3.0-Inch LCD (Black)
Too low to display
Click here to view all listings
Get more prices from Amazon

CameraBag 2


A stalwart in the photo category of the iOS App Store for a while, CameraBag from Nevercenter has been popular with lo-fi photo fans for years, thanks to its simple interface and effective 'one shot' filters. A version for desktops, CameraBag 1 proved popular, but with CameraBag 2, Nevercenter has completely redesigned the app from the ground up.

CameraBag 2 has proven a huge commercial success already, and after its release earlier this year the Mac version briefly became the highest-grossing non-Apple app in the Mac App Store. CameraBag 2 is intended to be an all-in-one editing tool with a plethora of vintage effects paired with what Nevercenter describes as a 'full suite of photographic tools' such as exposure and luminance controls. It has an extremely simple interface, showing your selected image large in the window with all the available effects visible on tabs to the right of your photo. In any editing tab, you can choose the 'Quicklooks' view and see what your photo would look like with any of the pre-made filters added to it.

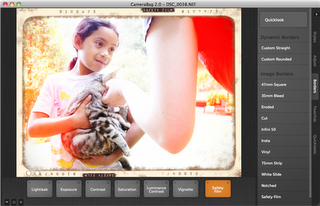
The 'Quicklooks' view allows you to see at a glance how your photo would look with any of CameraBag 2's filters applied.
Key Features:

Over 100 adjustable filters.
Exposure, color balance, shadow/highlight controls
Batch editing.
'Quicklooks' and live previews.
Fast processing.
RAW compatible.
Operating Requirements:

Mac: OSX 10.5 or newer, Intel CPU (Core 2 Duo or better)*
Windows: XP SP3, Vista, or Windows 7
1GB RAM
70MB hard drive space
At $29 from Nevercenter’s website (and $23.99 in the Mac App Store), CameraBag 2 is slightly pricier than an app like Nik Software's Snapseed, but still cheaper than Apple’s Aperture or Adobe’s Photoshop Elements. CameraBag also has an edge over one-trick apps like Snapheal or Photosplash as it features both filter effects and basic editing tools. For this review, I will take you though the steps of editing a photo in CameraBag from importing to creating a filter and batch processing.

Importing

CameraBag 2 is compatible with JPG, PNG, TIFF, and most RAW file formats. For this review, I imported a .NEF file from a Nikon DSLR. You can read more information about file handling and compatibility in Nevercenter's FAQ, which is here.


You can import photos into CameraBag 2 by dragging them into the window, clicking the 'Load' option in the welcome page, or by going to File / Open. Once you have opened an image, you can browse through other photos in the folder within CameraBag 2 by using your right and left arrow keys.


Styles

After loading your photo, CameraBag 2 with push you straight into the 'Styles tab where you can add various (an initially overwhelming) effects. You can choose to skip this step and move straight to the Adjustments tab if you only want to do subtle light and color adjustments. After you have made changes in the Adjustments tab, you can add a Style by returning to the Styles tab and clicking the '+' that will appear to the right of the filter name after a brief hover. Every time you hover over a name of a style, a live preview of the style’s effect on your photo will appear.


For this image I chose the delightfully retro “Light Leak” style.


I used the remix slider to make the photo appear as if the light was leaking from the right and left side of the camera, leaving my subject unaffected.
The 18 styles available in CameraBag 2 range from toy-camera effects like 'Plastic' to the more flattering 'Wedding' options and all are customizable using the 'Amount' slider to adjust the intensity of the effect and the 'Remix' slider to adjust the variation. The 'Remix' slider in particular is great for creating unique effects. For example, in the 'Hipster' style, the 'Remix' slider will adjust the vignette, color balance, light curves, and film grain size as you move from either end of the spectrum. For quick, batch editing of party photos, this could be where it ends - creating your unique effect and saving.

Adjustments

Not all of the tricks in CameraBag 2 are meant to make your pictures look like they were taken using a 19th-Century pinhole camera with a scratchy lens. Under the 'Adjustments' tab, you can crop, straighten, and control the levels of your photo using exposure, contrast, and saturation options. Under the 'Light' controls, you can adjust the RGB and Luminance Curves as well as adjust the shadows and highlights. The 'Color' controls let you do everything from color correction to split tone and selective saturation and the 'Photographic' effects add options like vignetting, film grain, and discoloration.

Every time you add an effect, a tile appears at the bottom of the screen. Here, you can return to your affects at any time to edit, change the layering of your effects, click the power-button to hide your effect, or the 'x' to remove it.
This screengrab shows my photo with the “Light Leak” tile deactivated. In the Crop/Straighten tab, a slider will straighten and auto-crop your photo. If you want to crop further, you can use the manual cropping tool with a rule-of-thirds grid built in or choose on of the many, pre-made ratios.
Adjustments is where you will also find the 'Constrain Size' option for saving your file - a rather strange place for it, as most photographers would expect to see this option somewhere in the file save dialog. This option appears as a tile next to your other adjustments and will be applied to all photos during batch editing.

Adding a Border

After you are done styling and adjusting, you can add a border. Options here range from simple, customizable borders to elaborate film-style frames. While some of these borders are subtle and only add a texture on the edges of the image, the bigger frames will auto-crop your photo.


Finishing Up

Once you have created the perfect look for you photo, its time to save it. And I don't just mean save your image - a feature I really like is the ability to save the effects that you've applied to an image as a filter, which you can use again in the future. Whether you design your own filter or use one of the 'pre-baked' options, you can give a large folder of photos the same, distinct look by using the 'Batch Process' option.


If you like what you've done so much that you want to process other images in the same way, you can save your adjustments as a new filter. Simply choose the 'Add Current…' button and choose a name. CameraBag 2 will add your adjustments to the Favorites tab. If you want to apply your choice of effects to more than one image, you can batch process entire folders of pictures very easily. Just go to 'Batch Process Folder' in the File menu....

...and add a 'postfix' that you want added to the filenames of your processed images.... ...create a new folder for the processed files, and you're done.
Batch processing takes a little time but will move much faster if you use the 'Constrain Size' option found in the adjustments tab. To give you some idea, batch processing a folder of 70 photos totaling 449MB took nearly 10 minutes on my Mac when set to export at full size, and 5 minutes using the 'Constrain Size' option to limit the width to 1200 pixels.

Conclusion

CameraBag 2 is great for batch editing photos, but I would not recommend it as a primary photo editing program as the tools and adjustments are not quite as precise as they should be. The sliders are great for quick editing, but for the perfectionist, it can be draining trying to toggle your way into the perfect light/shadow mix. You also cannot zoom in to see the details of your photograph during the editing process. Your photo will only ever be as big as your window will let it get which was fine for me on my large iMac, but an 11-inch Macbook Air user would be out of luck. This seems such a glaring omission that I'd be surprised if Nevercenter didn't fix it in an update.

Although CameraBag 2 is lacking in a couple of areas, its redeeming features far outweigh its weaknesses. The live previews and Quicklooks make editing photos extremely fast and easy, its many pre-made filters and styles are all customizable (which saves on the 'my photos look like everyone else's' effect), and the quick and easy batch processing is great.

In the future, I would like to see a customizable watermark feature as well as zoom-able viewing controls, but for now, CameraBag 2 has rightfully earned its place on the top of the App Store photo market.

We like: A ton of customizable filters, easy interface with effects tiles for quick revisions, live previews, quick processing, batch editing.

We don't like: Somewhat imprecise adjustment controls, no zoom control.

Panasonic Lumix DMC-FZ150 Review


We've just published our review of the Panasonic DMC-FZ150 24x superzoom. Successor to the slightly underwhelming FZ100, the Raw-shooting CMOS-powered FZ150 incorporates a lower-resolution 12MP sensor that the company says will outperform its predecessor's 14MP chip. The camera's 25-600mm equivalent lens incorporates 'Nano Surface Coating' to mitigate the effects of internal reflections. It can also shoot 1080p60 HD movies in the recently-created AVCHD Progressive standard. Is this the serious superzoom that enthusiasts have been waiting for? Read our review to find out.

Click here to read our Panasonic DMC-FZ150 review


Panasonic Lumix DMC-FZ150
Add to: Login to add this item to your gear lists.
Buy the Panasonic Lumix DMC-FZ150 from Amazon
Panasonic DMC-FZ150K 12.1 MP Digital Camera
with CMOS Sensor and 24x Optical Zoom (Black)
$489.77
Panasonic Lumix DMC-FZ47K 12.1 MP Digital Camera
with 24xOptical Zoom - Black
$284.99
Panasonic Lumix DMC-FZ100 14.1 MP Digital Camera
with 24x Optical Image Stabilized Zoom and 3.0-Inch LCD - Black
$437.99
Panasonic Lumix DMC-FZ30K 8MP Digital Camera
with 12x Image Stabilized Optical Zoom (Black)
$139.99
Panasonic Lumix DMC-FZ28K 10MP Digital Camera
with 18x Wide Angle MEGA Optical Image Stabilized Zoom (Black)
$407.72
Click here to view all listings
Get more prices from Amazon

Sigma SD1 / SD1 Merrill review


Review based on a production SD1 with firmware 1.05, and a production SD1 Merrill with firmware 1.0

Note: Most of the material in this review was prepared using the 'original' SD1 rather than the 'Merrill' model. Sigma assures us that the two cameras are identical in all practical respects, and we've verified this in key areas of image quality, speed and operability using an SD1 Merrill. Because of this, we consider this review to apply equally to both models. In the text we've used 'SD1' to refer to both cameras for the sake of brevity.

The SD1 created a huge amount of interest when it was announced at Photokina 2010. Having used Foveon's original 4.7x3MP sensor in its SD and DP series of cameras, Sigma bought the sensor company in 2008 and instructed it to focus its efforts on high quality stills photography. The result was a 15x3MP sensor of the standard APS-C size (approx. 24 x 16mm, slightly larger than Foveon's previous designs), and it's around this that the SD1 is built.

The SD1's original pricing caused a great deal of dismay; at an RRP close to that of the professional full-frame Nikon D3X and Canon EOS-1Ds Mark III SLRs, it was placed at a level most Sigma users found entirely unattainable. However almost a year on, after what we'd assume must have been disappointing sales, Sigma relaunched the camera as the 'SD1 Merrill' with a dramatically-reduced price tag.

The SD1 Merrill still isn't cheap, though, in fact it's one of the most expensive APS-C SLRs on the market. But at a price of around £1800 / € 2100 / $2300, at least it's now in the same ball park as top end models like the Canon EOS 7D and Nikon D300s. As such, it's graduated from being a distinctly niche product to one that many more professional and enthusiast photographers might plausibly consider buying.

The SD1 is a camera with a solid specification, though not one that particularly stands out in the enthusiast-grade DSLR sector. In terms of size and body design, metering and autofocus systems, and external controls, it's most comparable to the likes of the Canon EOS 7D, Pentax K-5, Nikon D7000 and Sony SLT-A77. What it doesn't offer, though, are two features that have become standard over the past few years - movie mode and live view. We suspect that the omission of video capability may not lose it too many buyers amongst its target market, but for a high-resolution camera that would seem particularly suited to studio work, the lack of live view (and the critical focusing and composition it allows) could be a deal-breaker.

The other potential hurdle for the SD1 is its use of Sigma's own SA lens mount. The company builds a wide range of lenses for the mount, and many of them are very good indeed. But we ask ourselves how many people will be willing to risk spending money building up a collection of lenses for a non-mainstream mount. It's also worth noting that few of Sigma's lenses offer any form of weather sealing to match the camera body.

Foveon sensor

Obviously the Sigma's defining feature is its 15x3MP Foveon sensor. For those of you who haven't come across the technology before, it uses a fundamentally different method for detecting color than any other camera sensor. Almost all other cameras place a pattern of colored filters in front of their sensors so that each individual photo site is only receives either red, green or blue light. To create a full-color pixel in the final image, clever mathematics is applied to estimate the values of the two unmeasured colors, based on the amount of those colors captured by adjacent photos sites.

Foveon's technology doesn't use filters - instead it uses the fact that different colors of light can penetrate silicon to differing extents. Foveon's chip measures the number of photons captured at three different depths corresponding to how well Red, Green and Blue can penetrate the chip. The main advantage of this is that, unlike other digital cameras, the Sigma measures all three colors at every one of its 15 million photo sites, capturing three times as much color data per-pixel as a conventional sensor. (Hence the company's reference to it being a 46MP camera.)

Because the Foveon sensor captures full color data at each pixel location, it's not susceptible to color moiré - false color patterns that are the result of those clever calculations occasionally getting things wrong, for example with finely-woven fabrics. Traditional Bayer-pattern sensors suppress this by using an optical low pass (or anti-aliasing) filter that slightly blurs the image at the pixel level, reducing the camera's resolution. The Foveon sensor doesn't use an AA filter, and is therefore able to resolve substantially more detail than its pixel count alone might suggest - in principle the SD1 has the potential to produce resolution similar to a 30MP Bayer-type sensor.

Sigma SD1 specification highlights

15x3MP Foveon X3 CMOS sensor
ISO 100-6400
11-point AF sensor (all cross-type)
5 frames per second continuous shooting
460,000 dot LCD screen
Shutter capable of 1/8000th second and rated for 100,000 cycles
Per-lens AF fine tuning
Sigma SD1 vs SD1 Merrill - what's the difference?

Sigma says the SD1 Merrill is functionally identical to the SD1, and our experience with the two cameras supports this entirely. The only visible differences between them are that the new model has 'Merrill' written on the back of the camera and on the baseplate serial number sticker. They also require different firmware files with different version numbers, but we suspect that this is purely to accommodate the change in model name within the EXIF data.

 
Design by Free WordPress Themes | Bloggerized by Lasantha - Premium Blogger Themes | Hot Sonakshi Sinha, Car Price in India